img by : https://www.hocho-knife.com/
Japanese food is famous for the ecstatic blends of divine-tasting Salmon pieces topped on hand-formed, cooked Japanese rice. Most people think of Salmon sushi right away, when Japanese food is mentioned.
Although some might prefer Donburi and Yakisoba noodles as convenient menus, sushi and sashimi dishes are considered among Japan’s best delicacies, topping both domestic and international charts of immense popularity among diners and gourmets alike. With social media-friendly aesthetics and vivid colors of fine ingredient selections, it is almost impossible to deny the magnetic pull Japanese delicacies have on the tastebuds and the growling stomach on a hectic, packed-schedule day.
The trends of Japanese food and the story behind its success revolve around the intricate food preparation processes required to master and hand-craft vivid-colored dishes that are both Instagram friendly and ideal for food bloggers worldwide.
However, what can never be opted out, for sure, is the mastery of the Japanese knives used to create these beautiful culinary originals. A Japanese knife is a special kind of knife forged by skilled craftsmen and blacksmiths who are trained to understand the requirements needed to make delicious, mouth-watering slices of Fatty Tuna and Sea bass. Although some believe sushi and sashimi dishes are just convenient foods that consist of raw ingredients topped on formed, Japanese rice or paper-thin slices of fish decorated alongside orange-colored crystal beads of Caviar, crafting these traditional delicacies require strong dedication, understanding, and long periods of training before mastering the essential techniques and skills.
With this as a challenge for Japanese aspiring chefs and even professional chefs, it is important for them to continuously search for the best Japanese knives that will aid in all processes that involve the skills and techniques of cutting, chopping, slicing, and filleting. As there will be many kinds of ingredients used in certain menus, Japanese culinary experts may own more than two knife types in-kitchen.
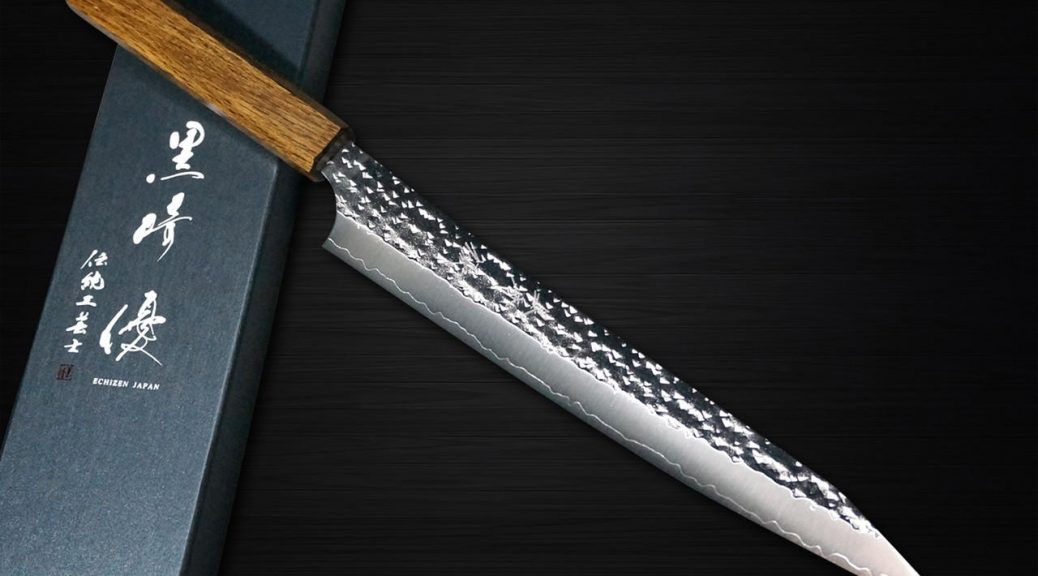
There are numerous Japanese knife brands that present themselves as ‘professional’ brands, solely offering knife models and series forged out of hard steels and premium-quality materials. However, only some brands are ‘trusted’ by users from all parts of the globe. Not only the best Japanese knives are made in Japan, where various cities and prefectures are home to fine-quality cutleries, but Japanese-origin knife brands have their own stories – they represent the Japanese traditions on the blades through knife textures, on-blade illustrations, and unique specifications to fit different purposes and needs. Among the top-tier knife brands in Japan, Yu Kurosaki is one of the most-remembered, best-selling knife brands with one-of-a-kind designs depicting nature and sometimes, Japanese Gods and Goddesses.
Yu Kurosaki is known for his crew of skilled craftsmen who are always attentive to improve and develop better knife models and series. Forging Japanese knives with extremely hard steels, all Yu Kurosaki knives are made to have high values of Rockwell hardness and are all razor-sharp right out of the box.
Yu Kurosaki and his team are known by Japanese food chefs and professionals in the food industry for premium-quality blades made to meet the needs and requirements in crafting Japanese delicacies, offering knife users with both single and double bevel knife options, varying knife types, and guarantee users with high edge retention, extreme blade sharpness, as well as rust-resistance. As Yu Kurosaki’s techniques of blade forging have been passed on from generations to generations, it is no doubt many culinary experts and professionals have a plenty of Yu Kurosaki knife series and models in the kitchen, as they serve many functions and purposes to complete challenging tasks on time.
As Yu Kurosaki is famous for its original designs, a beautiful dragon-engraved Santoku or Gyuto knife will be also be a wonderful gift for knife collectors.